Contributing
Thank you for your interest in contributing to Reanimated! From triaging and commenting on issues, through extending the documentation, to reviewing and sending Pull Requests, all contributions are more than welcome.
Ways to Contribute
-
Answering and handling open issues – great way to contribute without writing a single line of code is triaging the issues. We often get issues that have generic errors, occur only in very specific cases, do not have proper example or reproducible repository. One of the ways to help is by preparing and filling the details, which will help other contributors get up to speed with the issue faster.
-
Helping with documentation – helping with documentation can be as simple as checking for spelling and grammar. If you encounter situations that can be explained better or in more details, click Edit this page at the bottom of most pages to get started with your own contribution. You can also help updating the page structures from old versions, as some of them are still ported from Reanimated v2 docs. Read more about helping with documentation.
-
Reviewing Pull Requests – reviewing Pull Requests is crucial as it may help catch corner cases or bugs that the contributor may have missed. Every review matters, as it helps us polish the quality of the library.
-
Contributing to the Code – contributions to the source code generally come in the form of Pull Requests. By contributing to the code you help us with solving issues, fixing bugs or introducing new, amazing features. If you want to start your adventure with open source it's good idea to take a look at good first issue on GitHub. Read more about contributing to code here.
Repository overview
The React Native Reanimated repository is a monorepo with the following structure:
├── apps
│   ├── common-app // shared source code of example apps
│   ├── fabric-example // React Native app wrapper running the New Architecture for shared examples
│   ├── macos-example // React Native for MacOS app wrapper for shared example code
│   ├── next-example // Next.js wrapper for shared example code
│   ├── tvos-example // React Native for TVOS app wrapper for shared examples
│   └── web-example // React Native for Web app wrapper for shared examples
├── packages
│   ├── eslint-plugin-reanimated // source of eslint plugin
│   ├── react-native-worklets // source of worklets package
│   └── react-native-reanimated
│       ├── android // source code of Android native implementation
│       ├── apple // source code of iOS native implementation
│       ├── Common // shared C++ code
│       ├── scripts // JavaScript and bash scripts used in the CI pipeline
│       └── src // reanimated source code
└── docs
    ├── docs-reanimated // documentation described further in Helping with documentation
    └── docs-worklets // documentation for Worklets
Handling open issues
Understanding and reproducing the problem can be a very time consuming task. A great way to help other contributors quickly get up to the speed with solving an issue is providing a detailed description and a reproducible example. GitHub already has a template for creating issues, nevertheless we still encounter ones that don't have all the necessary details, like:
- a missing repository that we can clone to quickly see the problem,
- very generic reproduction steps,
- an incomplete or missing description,
- unrelated or truncated stack trace.
To help, you can ask the owner for these missing details or try to provide them yourself. You can try reproducing the issue and filling the description so that other developers can work on solving it right away! 🎉
Helping with documentation
One of the many ways you can contribute to this project is by improving the documentation. We try to keep it up to date, but there is still plenty of room for improvement. It is also important to update the docs whenever you introduce changes to the API or you discover any inconsistencies in the current API or behaviour. This is one of the most straightforward ways to contribute. Some of the pages are still in old, v2 format and you can help us convert them to the Reanimated 3 structure.
The Reanimated documentation uses Docusaurus and is hosted on GitHub Pages. The easiest way to start adding your changes is by clicking Edit this page located at the bottom of most pages.
Editing source locally
If you want to contribute more complicated changes, it's a good idea to edit them locally. That way you can run the changes on your setup to make sure everything looks as expected. To get started, follow the steps below:
- Read How to Open a Pull Request
- Clone react-native-reanimated
cd react-native-reanimatedyarncd docs/docs-reanimatedyarn && yarn start
This will start your local Docusaurus server running the documentation.
Project structure
Here you can find the most important parts of the react-native-reanimated/docs/docs-reanimated project. Not all folders are listed for brevity.
├── docs // contains folder with md/mdx files, each folder is a section in the side navigation, and each file is documentation page
├── src
│   ├── components // contains components used to make the pages interactive
│   └── examples // contains examples that are later presented in the documentation
└── static
    ├── img // contains images used in the docs
    └── recordings // contains video recordings of the examples
Documentation page structure
It's important to maintain a consistent structure for the site, as this helps developers navigate easily and quickly find what they are looking for. In v3 documentation, we follow this page structure:
- Introduction – short introduction what given feature does.
- Reference – simplest possible usage showcase and type definitions, make sure that example code runs when someone copies it to quickly prototype.
- Arguments – details about the arguments that given method accepts.
- Returns – details of returned values.
- Example – video, gif or interactive demo with source code. It is good practice to provide resources in both light and dark mode.
- Remarks – make sure to highlight everything that might not be obvious i.e. platform specific quirks, compatibility issues, additional setups required.
- Platform compatibility – information about platforms that given feature supports.
The structure may vary depending on the given feature. If the one above doesn't seem to be a good fit for you, try to find a similar feature and see how it is documented.
Documentation writing style guide
Developers want to find the solutions to their problems as fast as possible. To address this, we optimize our documentation for skimming. We believe that improvements to documentation have a direct impact on the overall developer experience. This section outlines some best practices for writing technical documentation. Treat these guidelines as recommendations rather than absolute rules.
If you can spare 2 hours, we highly recommend taking a free Technical Writing One course by Google.
Avoid passive voice
Most sentences in technical documentation should use active voice. Sentences in active voice are usually simpler than those in passive voice.
See the following examples:
- The arguments are provided to the function.
- A worklet is generated by the babel plugin.
- UI thread is being used by Reanimated.
which if we rewrite these sentences to active voice become simpler:
- The function receives the arguments.
- The babel plugin generates a worklet.
- Reanimated runs on the UI thread.
Prefer short, clear sentences
When it comes to technical documentation, simplicity is key. Prefer writing short and simple sentences.
Oftentimes you can split long sentences into shorter ones by repeating the sentence subject.
Keep in mind that many readers aren't native English speakers.
Split paragraphs into organized lists
People tend to skip over long paragraphs of text. Organized lists are usually easier to read. They help developers get the information they are looking for faster.
Remember to introduce the list first.
The Reanimated installation steps:

- Add Reanimated package form npm
- Add babel plugin to babel.config.js
- Reset cache
Avoid acronyms and abbreviations
Acronyms can often lead to confusion.
For example, in the context of libraries, abbreviations like REA, RNGH, RNS, may be obvious to developers proficient in the React Native open source space, but completely unknown to beginners.
Some acronyms, such as RN, can mean both React Native and React Navigation.
When explaining topics that often use domain-specific acronyms, such as JSI, JNI, JSC, you should first introduce them. For example, JavaScript Core (JSC) or JavaScript Interface (JSI).
The following rule doesn't apply to globally established abbreviations like UI, API, HTML, TS etc.
Use contractions
Prefer writing using contractions like don't, doesn't, it's instead of full forms like do not, does not, it is.
Embedding interactive examples
We try to make the code examples as easy as possible. This is why good, interactive examples are crucial. To create interactive examples in the documentation you can use InteractiveExample component. It takes src prop that expects source of a component that you can declare in src/examples, and a component prop that showcases given code.
Example with a video
import AnimatedKeyboardSrc from '!!raw-loader!@site/src/examples/AnimatedKeyboard';

<InteractiveExample
  src={AnimatedKeyboardSrc}
  component={
    <ThemedVideo
      center
      width={300}
      sources={{
        light: '/recordings/useAnimatedKeyboard_light.mov',
        dark: '/recordings/useAnimatedKeyboard_dark.mov',
      }}
    />
  }
/>;
Example with an interactive component
import DecayTrain from '@site/src/examples/DecayTrain';
import DecayTrainSrc from '!!raw-loader!@site/src/examples/DecayTrain';

<InteractiveExample
  src={DecayTrainSrc}
  component={<DecayTrain />}
  label="Grab and drag the train"
/>;
Contributing to the Code
Posting Pull Requests to the issues is a great way to contribute to Reanimated. If you are eager to start contributing right away, we have a list of good first issues that contain bugs which have limited scope. In this section we'll describe how to play around with Reanimated setup in more detail.

 caution
Make sure that you have React Native setup properly and you are familiar with How to Open a Pull Request before reading this section further.
We have shared code of example app, that is run on different platforms and architectures. When working on an issue the most important destinations will be:
apps/common-app– shared source code with example apppackages/react-native-reanimated/src/reanimated2– containing source code related to JS part of Reanimated featurespackages/react-native-reanimated/android/src/main/java/com/swmansion/reanimated– containing source code related to Android native part of Reanimated featurespackages/react-native-reanimated/apple– containing source code related to iOS native part of Reanimated features
We use two separate example apps depending on the feature or a bug we're currently working on. If the code relates to CSS Animations then we start from editing
apps/common-app/src/apps/css/examples/animations/screens/testExamples/Playground.tsx
For other features like worklet API and Layout Animations we would usually start from editing
apps/common-app/src/apps/reanimated/examples/EmptyExample.tsx
This is the part that we often attach to PR so other developers can test the same use-case (remember not to commit your changes from Playground/EmptyExample file!). Next, we run the apps/fabric-example app and start development.
infoIf you want to implement a new feature or fix a bug, but still are unsure after reading through this section or could use some guidance, you can reach out to the Reanimated Team on Discord.
Working with Android
To start with, let's install all dependencies:
yarn && yarn build-allcd apps/fabric-exampleyarn start– make sure to start metro bundler before building the app in Android Studio.
and open react-native-reanimated/apps/fabric-example/android with Android Studio.
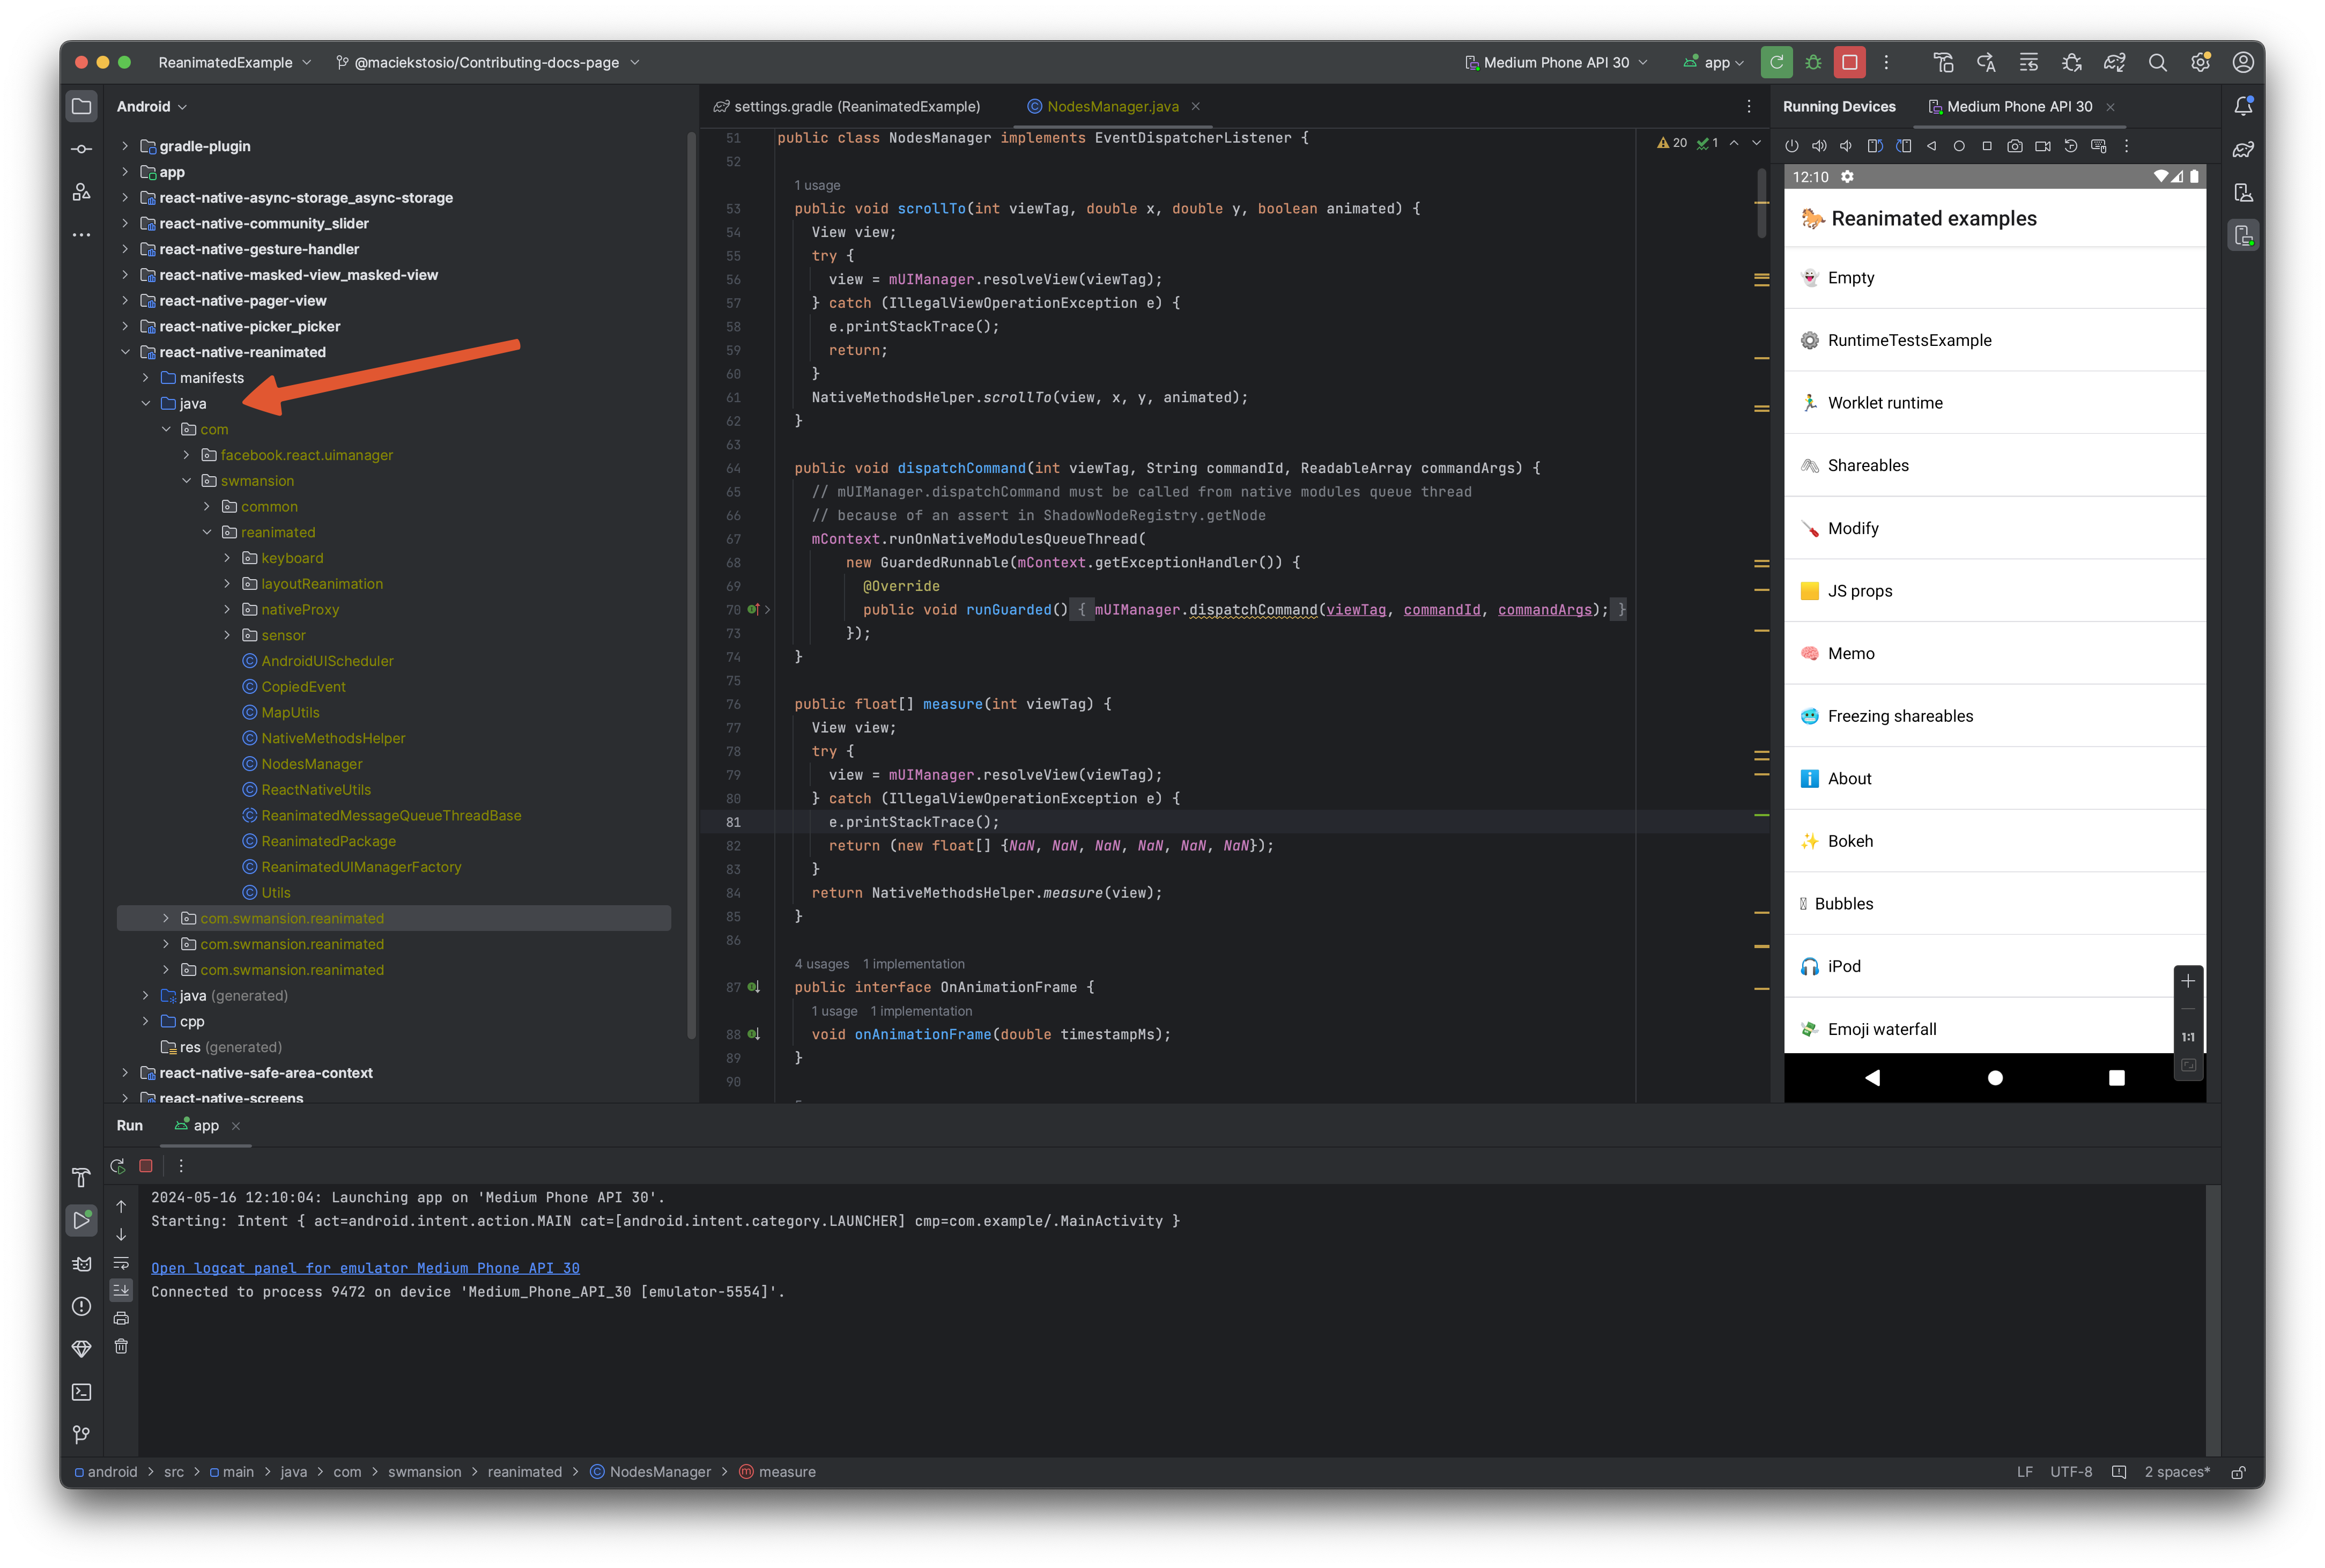
The native source code of Reanimated can be found in react-native-reanimated module, in /packages/react-native-reanimated/android/src/main/java/com/swmansion/reanimated. Make sure the Metro bundler is running. You can now build React Native app or debug native code.
Working with iOS
To begin with, let's install all the necessary dependencies:
yarn && yarn build-all(cd apps/fabric-example/ios && bundle install && bundle exec pod install)– install Pods for iOScd apps/fabric-example && yarn start– make sure to start metro bundler before building the app in Xcode.
and open react-native-reanimated/apps/fabric-example/ios/ReanimatedExample.xcworkspace with Xcode.
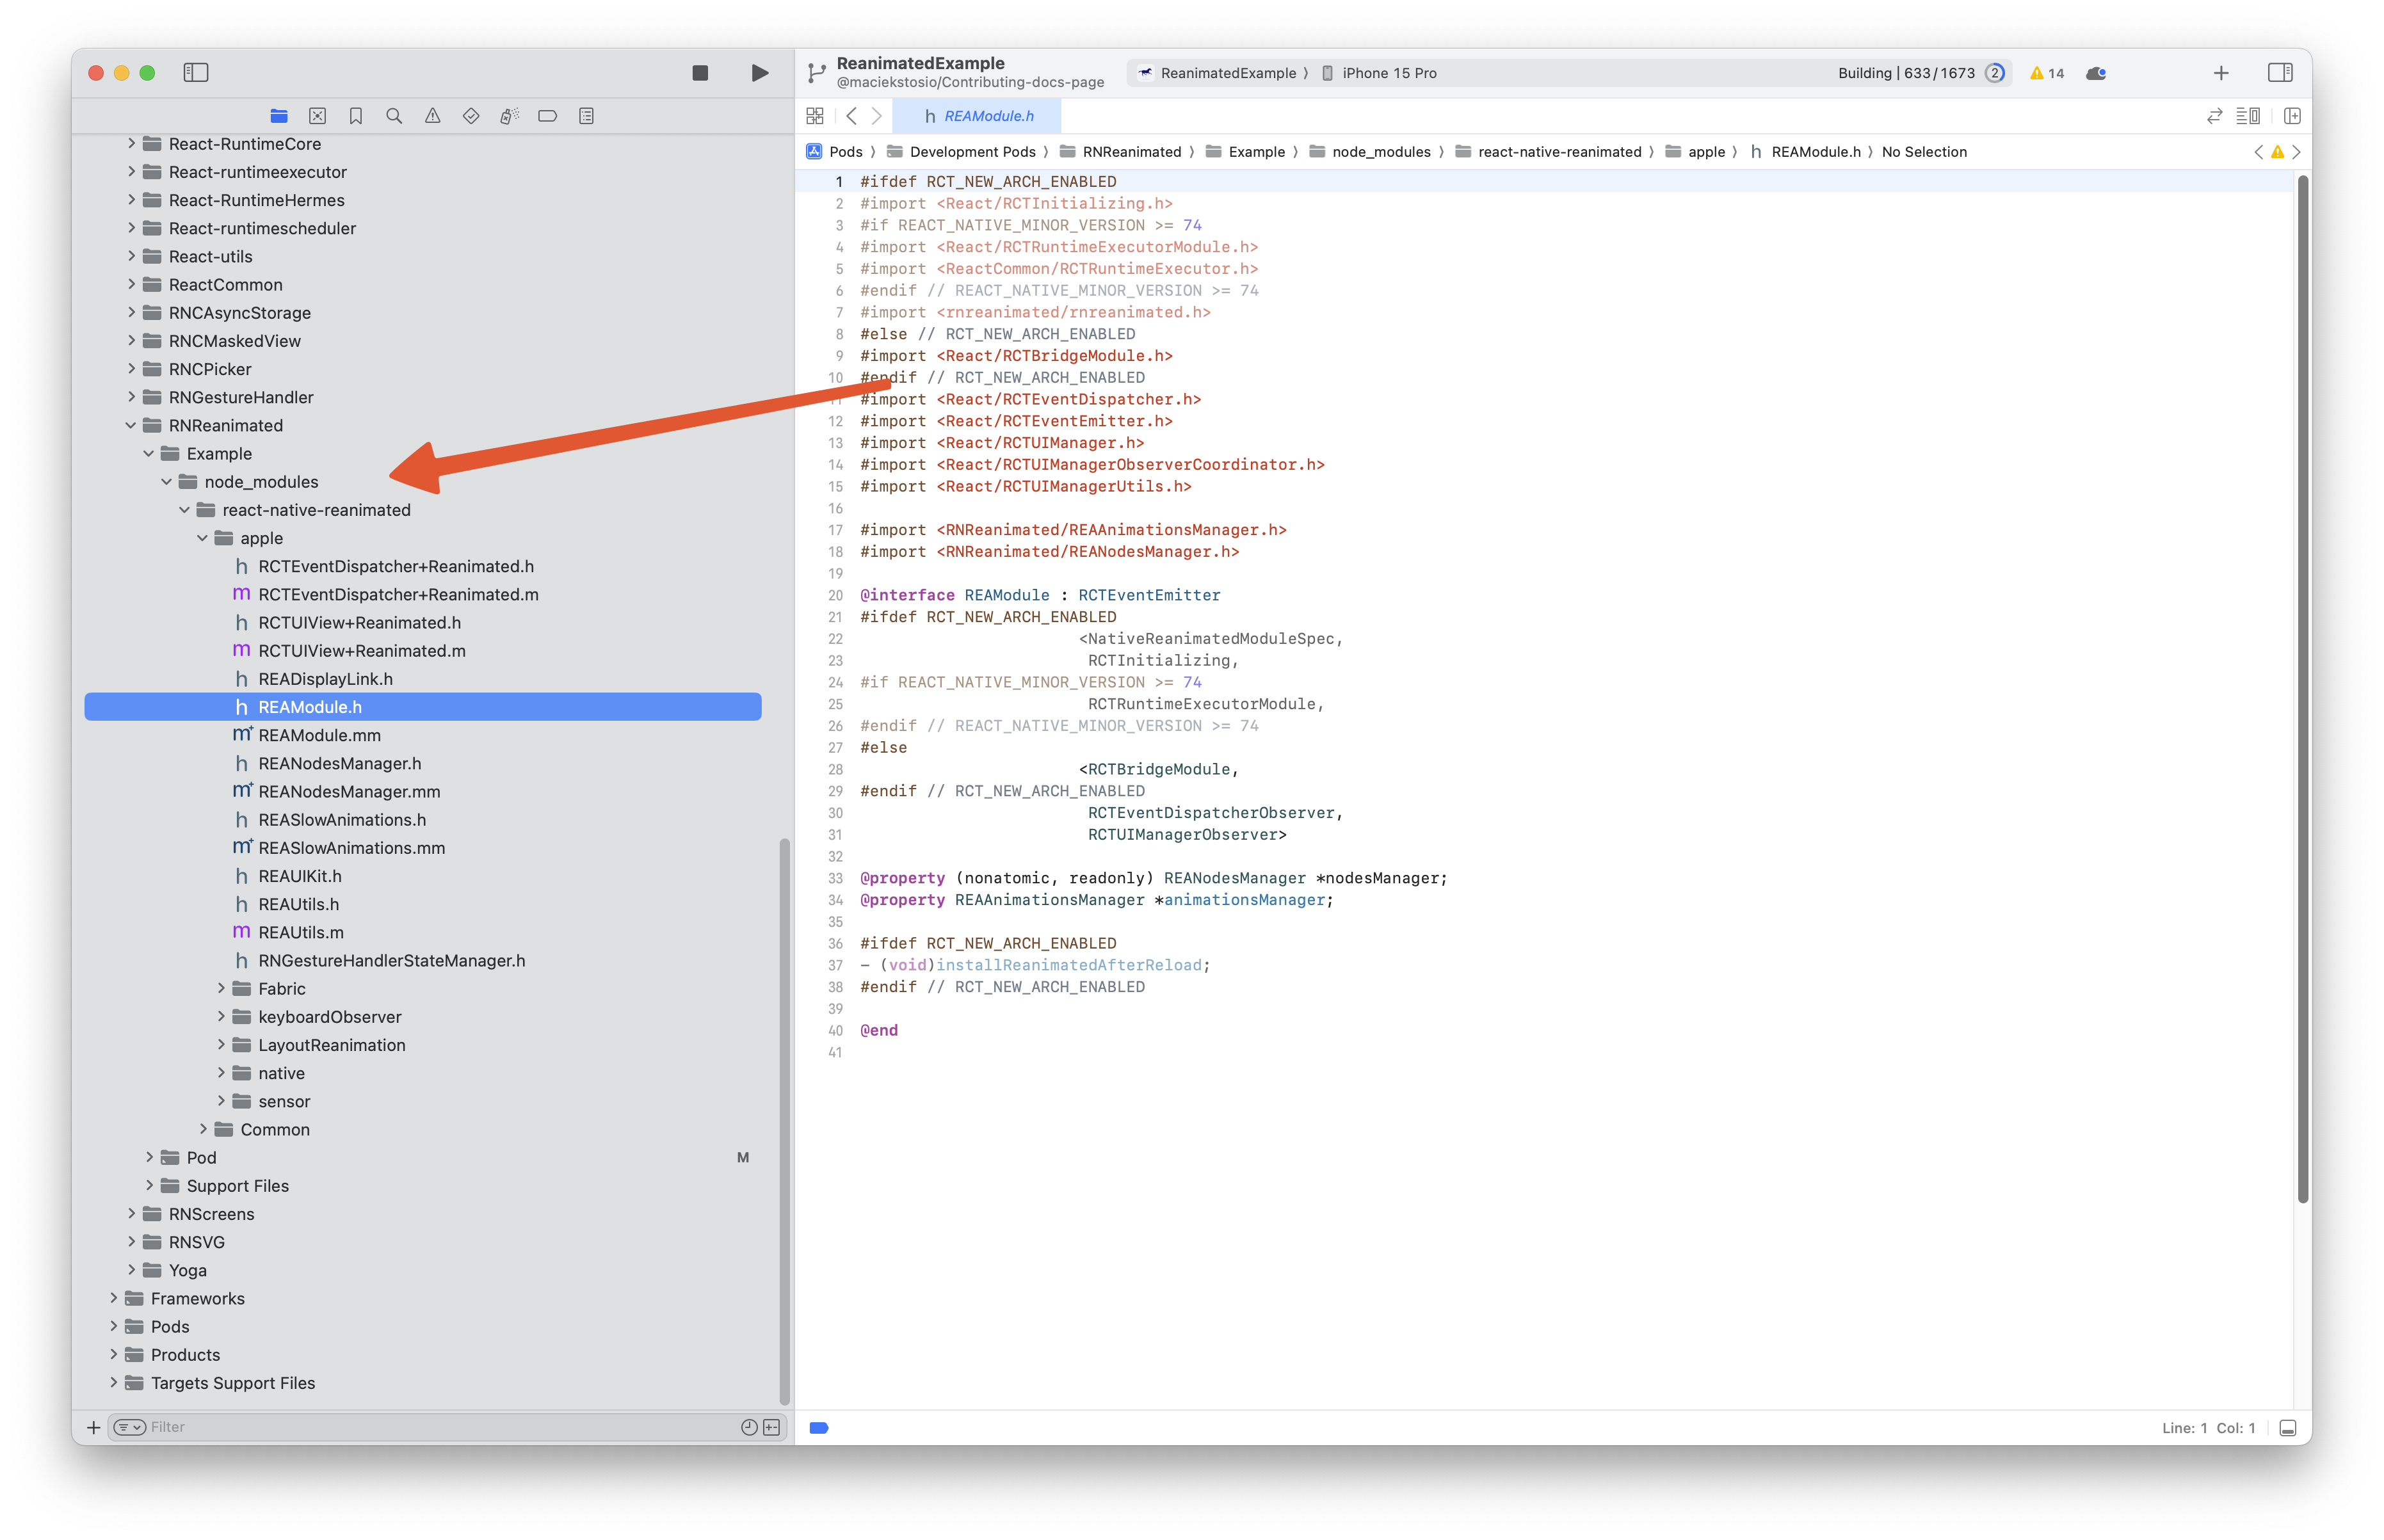
To find the native source code of Reanimated navigate to Pods > Development Pods > RNReanimated > Example > ... > ... > node_modules > react-native-reanimated > apple. Make sure the Metro bundler is running. You can now build React Native app or debug native code.
Preparing a Pull Request
When the code changes are ready, it's time to open a Pull Request. We configured the repository to come with a template to help you post your changes properly. The most important of these are:
- Summary:
- If you're solving a specific issue, start by linking it, for example: Fixes #2137 (here goes a full link to an issue and GitHub shortens it into a #number format).
- Write what are your motivations and how you solved the problem.
- If applicable, it's a good idea to include a screenshot or a video of before and after making changes.
- Test plan – Describe how others can test your changes, here we usually attach the code from your modified
EmptyExample, that you used for testing.
Testing changes in your project
If you want to test changes in your own project, the best way is to create a patch using git diff or by pointing to a specific commit in package.json.
See you on GitHub! 🎉